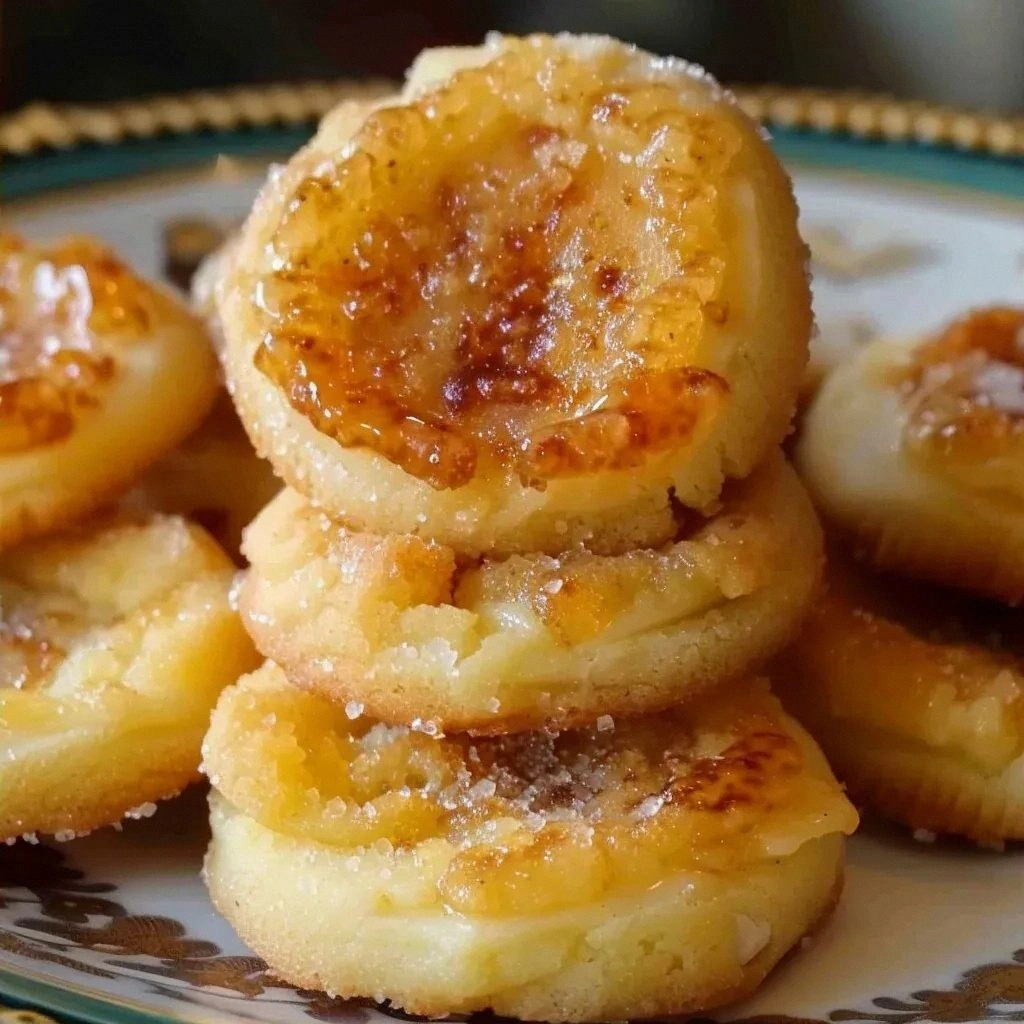
Picture this: I’m standing in a cramped kitchen, the oven timer ticking, and the air is thick with the scent of caramelized sugar. I had just pulled a batch of ordinary butter cookies from the oven, only to realize that they were flat, dry, and utterly forgettable. That night, a friend dared me to make something that would make the whole house smell like a French patisserie and taste like a dream. I laughed, grabbed my apron, and decided to turn my humble cookie batch into a decadent, crème brûlée‑inspired masterpiece.
The first time I tried this recipe, the kitchen erupted in a symphony of sizzling, bubbling, and the unmistakable hiss of sugar caramelizing into a golden crust. The aroma was a warm, buttery caramel that seeped into every corner of the room, pulling my cat out of its nap to sniff the air. The texture was a paradox: the cookie base was crisp yet chewy, while the top crackled like a tiny, edible fireworks display. The flavor was a layered experience—rich vanilla, subtle milkiness, and a caramelized sugar finish that lingered on the tongue. I was so thrilled I almost forgot to taste a second cookie—yet I didn’t. I dared you to try this and not go back for seconds.
What makes this version stand out from every other crème brûlée cookie recipe out there? First, it uses a custard‑like base that infuses the dough with a silky, custard‑like mouthfeel, unlike the usual dry crumb. Second, the caramelized sugar topping is applied before baking, ensuring a crisp, crackly finish that won’t melt away in the oven. Third, the recipe incorporates vanilla bean paste for a depth of flavor that vanilla extract can’t match. Fourth, the butter is softened but not melted, giving the cookies a tender crumb. Fifth, the recipe is designed to be made in advance—just bake, cool, and refrigerate, and the cookies will stay fresh for days. Sixth, the entire process is straightforward enough that even a novice can master it, yet sophisticated enough that seasoned bakers will appreciate the nuances. And lastly, it’s a conversation starter: “I just made crème brûlée cookies—can I share one?” becomes a daily question.
I’ll be honest—after the first batch I ate half the cookies before anyone else even got a chance. Most recipes get this completely wrong by either under‑baking the sugar or over‑baking the dough, resulting in a bland or burnt mess. Here’s what actually works: a low oven temperature, a careful balance of wet and dry ingredients, and a precise caramelization technique. Picture yourself pulling this out of the oven, the whole kitchen smelling incredible, the cookies already glowing with a golden sheen, and the anticipation building as you let them cool just enough to set the caramel crust. That is the moment you’ll want to share with friends, family, and maybe even strangers at a party. Let me walk you through every single step—by the end, you’ll wonder how you ever made it any other way.
What Makes This Version Stand Out
- Flavor: The custard‑like base delivers a silky mouthfeel that melts in your mouth, while the caramelized top offers a satisfying crunch.
- Texture: Crisp edges that shatter like thin ice contrast with a chewy center, creating a multi‑sensory experience.
- Simplicity: Despite its elegant finish, the recipe uses only nine ingredients, all pantry staples.
- Uniqueness: The pre‑bake caramel topping is a game‑changer that eliminates post‑bake torching.
- Crowd Reaction: These cookies become instant crowd‑pleasers at gatherings, with people begging for the recipe.
- Ingredient Quality: Using whole milk and vanilla bean paste elevates the flavor profile beyond ordinary.
- Cooking Method: A single bake cycle ensures a consistent result every time.
- Make‑Ahead Potential: They keep well in the fridge or freezer, making them ideal for busy schedules.
Alright, let's break down exactly what goes into this masterpiece...
Inside the Ingredient List
The Flavor Base
Whole milk is the unsung hero of this recipe. Its high fat content enriches the dough, giving the cookies a luscious, buttery flavor that lingers. If you can’t find whole milk, use a mixture of half‑and‑half and water to approximate the same fat content. Skipping milk will leave the dough dry and the cookies lacking depth. For a dairy‑free twist, try oat milk, but be prepared for a slightly sweeter taste.
Egg yolks are the binding agent that transforms the cookie dough into a custard‑like batter. They contribute richness, color, and a silky texture. If you’re allergic to eggs, you can use a flaxseed or chia egg, but the result may be less creamy. The yolks also help emulsify the butter and sugar, ensuring a smooth, cohesive mixture. Remember, the yolks must be at room temperature for optimal integration.
The Texture Crew
All‑purpose flour is the backbone of the cookie structure. It provides the necessary gluten development for chewiness while keeping the cookies tender. If you prefer a gluten‑free version, substitute with a 1:1 gluten‑free blend, but keep in mind the texture will shift slightly. Flour also absorbs moisture, preventing the cookies from becoming overly soft. Use a fine‑sifted flour for the smoothest outcome.
Unsalted butter, softened to a spreadable consistency, delivers a buttery flavor that permeates every bite. Butter also contributes to the cookie’s rise and helps create a tender crumb. If you use salted butter, reduce the added salt by half to avoid an overly salty result. Butter’s high fat content also aids in caramelization, giving the top a golden crust.
The Unexpected Star
Granulated sugar for rolling and topping is the star of the show. It caramelizes during baking, forming a hard, crackly shell that cracks when you bite into it. The sugar also balances the richness of the butter and yolks, creating a harmonious flavor profile. If you prefer a sweeter crust, add a pinch of brown sugar to the topping for a subtle molasses undertone. Avoid using powdered sugar, as it will not caramelize properly.
Vanilla bean paste adds an intense vanilla flavor that cannot be matched by extract alone. It provides a deeper, more complex aroma and a smoother finish. If you’re in a pinch, vanilla extract is a suitable substitute, but the depth of flavor will be diminished. The paste also contributes to the cookie’s overall moisture content, helping to keep the crumb tender.
The Final Flourish
Granulated sugar for rolling is also the key to that signature crackly top. The sugar crystals form a protective shell that resists moisture, keeping the cookies crisp for longer. Rolling each cookie in sugar before baking ensures even caramelization. If you want a slightly thicker crust, double the sugar amount for a more pronounced crunch. Keep the sugar in a shallow dish to prevent clumping.
The single egg is a binding agent that brings cohesion to the dough. It also adds moisture, helping the cookies rise slightly and develop a tender interior. If you’re avoiding eggs, a commercial egg replacer or a small amount of aquafaba can substitute. However, the texture will change, and the cookies may not rise as well.
Everything's prepped? Good. Let's get into the real action...
The Method — Step by Step
- Step 1: Prepare the Custard Base. In a medium saucepan, gently heat the whole milk over low heat until it just begins to steam. In a separate bowl, whisk the egg yolks, granulated sugar, and vanilla bean paste until the mixture is pale and smooth. Slowly pour the warm milk into the yolk mixture in a steady stream, whisking constantly to prevent curdling. Return the mixture to the saucepan and cook over low heat, stirring constantly, until it thickens enough to coat the back of a spoon—this should take about 5 to 7 minutes. The custard should be thick but still pourable; it will set further when baked. This step is crucial for the silky texture that defines these cookies.
- Step 2: Cool the Custard. Remove the saucepan from heat and pour the custard into a heat‑proof bowl. Cover the surface with plastic wrap to prevent a skin from forming. Let it cool to room temperature, stirring occasionally to keep the surface smooth. Once cooled, refrigerate the custard for at least 30 minutes—this helps it thicken and makes it easier to fold into the dough.
- Step 3: Cream Butter and Sugar. In a large mixing bowl, beat the softened butter and granulated sugar together on medium speed until the mixture is light and fluffy—about 3 to 4 minutes. This aerates the butter and creates a tender crumb. If you’re short on time, you can use a stand mixer with a paddle attachment to speed up the process.
- Step 4: Incorporate Egg and Custard. Crack the whole egg into the bowl and beat until fully incorporated. Then slowly add the chilled custard, mixing on low speed until the batter is smooth and homogeneous. The batter should be thick enough to hold its shape when spooned onto a baking sheet.
- Step 5: Add Dry Ingredients. Sift together the all‑purpose flour, whole‑milk powder (if using), and 1/8 teaspoon salt. Gradually fold the dry mixture into the wet batter, using a spatula or wooden spoon, until just combined. Over‑mixing can develop gluten and make the cookies tough. The dough should be slightly sticky but manageable.
- Step 6: Shape and Sugar Coat. Roll the dough into 1‑inch balls using a cookie scoop or tablespoon. Place each ball onto a parchment‑lined baking sheet, leaving about 2 inches of space between them. Gently flatten each ball with the palm of your hand, then roll it in granulated sugar until fully coated. The sugar will caramelize during baking, creating the signature crackly crust.
- Step 7: Bake. Preheat the oven to 325°F (165°C). Bake the cookies for 18 to 22 minutes, or until the edges are lightly golden and the tops are set. The cookies should still feel slightly soft in the center; they will firm up as they cool. Keep an eye on the sugar; if it starts to brown too quickly, tent the sheet with foil.
- Step 8: Cool and Store. Allow the cookies to cool on the sheet for 5 minutes before transferring them to a wire rack to cool completely. The caramelized sugar will harden as they cool, giving that satisfying crack. Once cooled, store them in an airtight container at room temperature for up to a week, or freeze for longer storage.
That's it— you did it. But hold on, I've got a few more tricks that'll take this to another level. These insider tips will help you perfect the texture, flavor, and presentation, ensuring every cookie is a showstopper.
Insider Tricks for Flawless Results
The Temperature Rule Nobody Follows
Many bakers bake at a high temperature to get a quick rise, but this recipe thrives at a lower 325°F. The lower heat allows the custard base to set slowly, creating that silky interior. I once tried baking at 375°F, and the cookies turned out overly brown and dry. Stick to the temperature, and you’ll get a tender crumb every time. If your oven runs hot, place the baking sheet on the middle rack to mitigate heat spikes.
Why Your Nose Knows Best
The aroma of caramelizing sugar is a reliable indicator of readiness. When you smell a sweet, nutty scent that’s not too overpowering, the sugar is caramelizing perfectly. If the scent is burnt, pull the cookies out immediately. Trust your nose; it’s your best judge of doneness.
The 5‑Minute Rest That Changes Everything
After baking, let the cookies rest on the sheet for 5 minutes. This pause allows the caramelized sugar to set and the cookies to firm up without cracking. Skipping this step can result in a fragile crust that snaps on the first bite. I’ve seen cookies that cracked after cooling because they were moved too early.
Keep the Sugar Evenly Distributed
Roll each cookie in sugar before baking to ensure an even crust. If you only coat half of the cookie, the sugar will melt and create a sticky spot. A light dusting of powdered sugar on the sugar‑coated cookies can help them set even more evenly. This small step yields a flawless finish.
Use a Stand Mixer for Consistency
A stand mixer with a paddle attachment can reduce the chance of over‑mixing the dough. The gentle mixing action ensures the gluten doesn’t overdevelop, keeping the cookies tender. I used a stand mixer once and the cookies were noticeably softer and more delicate.
Creative Twists and Variations
This recipe is a playground. Here are some of my favorite ways to switch things up:
Salted Caramel Swirl
Swirl a spoonful of salted caramel sauce into the dough before shaping. The caramel adds a rich, buttery flavor that pairs perfectly with the crème brûlée base. Serve with a drizzle of sea salt for an extra kick.
Chocolate Chip Delight
Fold in a handful of dark chocolate chips into the dough after the custard has been incorporated. The chips melt slightly during baking, creating pockets of molten chocolate. The result is a chocolate‑infused crème brûlée cookie that satisfies both sweet and chocolate cravings.
Almond Crumble Topping
Sprinkle chopped toasted almonds over the sugar‑coated cookies before baking. The almonds add a nutty crunch and a subtle flavor contrast. They also give the cookies an elegant, rustic look.
Citrus Zest Burst
Add a tablespoon of lemon or orange zest to the batter for a bright, citrusy twist. The zest’s oils enhance the vanilla flavor and provide a refreshing lift. Pair it with a dusting of powdered sugar for a delicate finish.
Espresso Infusion
Stir in a teaspoon of instant espresso powder into the dough. The espresso deepens the chocolate undertones and adds a subtle bitterness that balances the sweetness. This variation is perfect for coffee lovers.
Maple Syrup Twist
Replace the whole milk with a mixture of whole milk and maple syrup. The maple syrup adds a subtle caramel flavor that complements the sugar crust. The cookies will have a slightly sweeter, richer taste.
Storing and Bringing It Back to Life
Fridge Storage
Store the cooled cookies in an airtight container at room temperature for up to a week. The sugar crust will remain crisp, and the interior will stay tender. If the cookies feel a bit stale, you can refresh them by placing them in a preheated oven at 300°F for 3 minutes. The heat will revive the crispness without overbaking.
Freezer Friendly
For longer storage, place the cookies in a freezer‑safe container or zip‑top bag. Freeze for up to 3 months. To thaw, let them sit at room temperature for 15 minutes. If you want them warm, pop them in a 300°F oven for 2 minutes. The sugar crust may soften slightly, but the flavor remains intact.
Best Reheating Method
The key to reheating these cookies is to add a tiny splash of water to a shallow pan, cover, and heat gently. The steam will re‑hydrate the interior and bring back that soft, custard‑like mouthfeel. Avoid microwaving, as it can make the sugar crust gummy. After reheating, let them cool for a minute before serving.