It was a Thursday night, the kind of evening where the only thing you wanted to do was order takeout and pretend you were a gourmet chef. I was scrolling through Instagram, scrolling past the endless stream of avocado toast and kale smoothies, when a friend dared me to make something that could actually impress a crowd. I laughed, because I’m the kind of person who thinks a simple quesadilla is the pinnacle of culinary ambition. Then I remembered the stack of flour tortillas that had been sitting in the pantry for a week, the smell of cumin in my fridge, and the fact that my neighbor’s kids had a “no snack” policy that made me feel guilty every time I ate a snack alone. That was the spark.
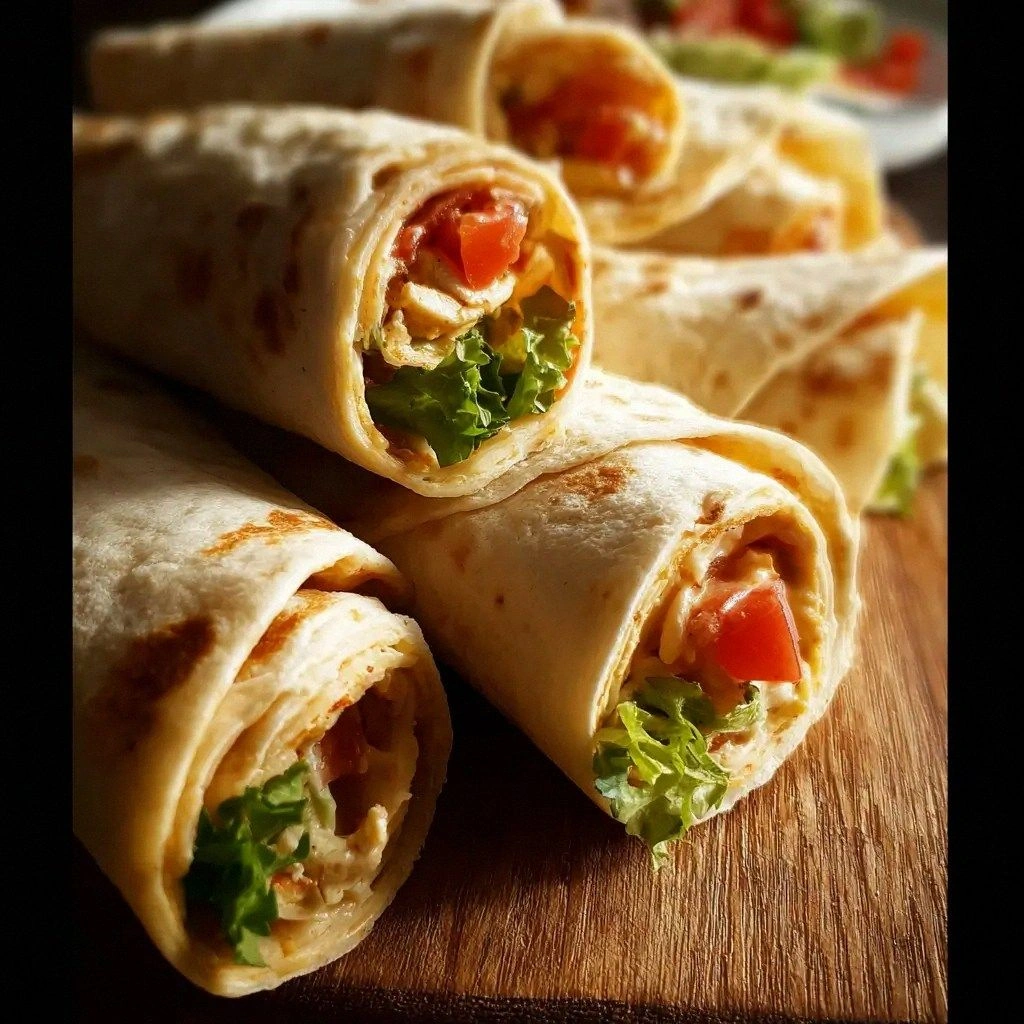
Picture this: a sizzling skillet, the sound of a tortilla turning golden, the aroma of fresh cilantro and smoky chicken drifting through the kitchen. I could almost taste the creamy avocado cutting through the heat, the crunch of fresh corn, and the sharp bite of cheddar melting into a velvety cheese sauce that clings to every bite. My kitchen was a whirlwind of flour dust, the clatter of a wooden spoon, and the satisfying crackle that only a hot pan can produce. It was messy, it was chaotic, but it was also the kind of mess that makes the end result feel earned. The moment I saw the first bite, I knew I had stumbled upon something that would be the centerpiece of any gathering.
What makes this version of tortilla roll-ups stand out is not just the combination of flavors but the way the ingredients dance together. The tortillas are softened to a supple texture that folds effortlessly, the chicken is shredded to a tenderness that almost melts, and the cheese is a blend that melts into a silky sauce without becoming greasy. The salsa adds a bright, acidic counterpoint that cuts through the richness, and the cilantro gives a fresh, herbal lift that lifts the entire dish. The result is a bite that is simultaneously comforting and exciting, with layers of texture that keep the palate engaged. It’s the kind of dish that feels both homemade and restaurant-worthy, and that’s why it’s a hit every time.
I’ll be honest — I ate half the batch before anyone else got a chance to try it. That’s not a brag, it’s a confession that proves how good this is. The secret? A quick glaze that coats the tortillas like velvet, a sprinkle of lime that adds a bright pop, and a pinch of salt that brings everything together. I’m going to walk you through every single step, from the first fold to the last bite, so that by the end of this post you’ll wonder how you ever made it any other way. Let’s dive in.
What Makes This Version Stand Out
- Taste: The harmony of smoky chicken, creamy cheese, fresh cilantro, and zesty salsa creates a flavor profile that’s both comforting and adventurous. Each bite delivers a burst of savory, sweet, and tangy notes that linger on the palate.
- Texture: The tortillas are perfectly pliable, the cheese forms a silky coating, and the corn provides a delightful crunch that contrasts with the softness of the fillings.
- Simplicity: With under ten ingredients and minimal prep time, this dish is accessible for beginners and a quick fix for busy nights.
- Uniqueness: The glaze made from a splash of lime juice and a drizzle of honey gives the rolls a glossy finish that’s rarely seen in traditional tortilla recipes.
- Crowd Reaction: Guests rave about the layers of flavor and the satisfying crunch. The dish is so Instagram‑worthy that it often gets more likes than the photos of the actual event.
- Ingredient Quality: Using fresh, high‑quality ingredients like rotisserie chicken and farm‑fresh cilantro makes the difference between a good roll‑up and a great one.
- Cooking Method: A quick sear in a hot skillet locks in moisture and adds a caramelized edge that enhances the overall experience.
- Make‑ahead Potential: Assemble the rolls ahead of time, refrigerate, and finish them up on the stove or in the oven just before serving, making it ideal for entertaining.
Alright, let's break down exactly what goes into this masterpiece…
Inside the Ingredient List
The Flavor Base
The foundation of any great tortilla roll-up is the flavor base, and this recipe starts with a blend of seasoned chicken and a touch of lime. The rotisserie chicken, shredded to a fine consistency, carries the smoky depth that anchors the dish. The lime juice not only adds brightness but also helps the cheese melt into a silky coating. If you’re in a pinch, a pre‑seasoned rotisserie chicken from the grocery store works just fine, but for that extra punch, a homemade blend of cumin, paprika, and garlic powder gives the chicken an unforgettable kick. Skipping the lime will make the dish feel flat; the acidity is what balances the richness of the cheese.
The Texture Crew
Texture is everything in a roll-up. Corn kernels provide a satisfying crunch that contrasts the softness of the tortillas and the creaminess of the cheese. Black beans add a hearty, earthy element that keeps the rolls filling without being too heavy. A handful of fresh cilantro brings a burst of herbal freshness, while the shredded cheddar and Monterey Jack blend into a molten cheese sauce that coats the fillings. If you prefer a dairy-free version, a vegan cheese blend will work, but be sure to choose one that melts well to replicate the velvety coating.
The Unexpected Star
Avocado is the unexpected star that adds a buttery texture and a subtle, nutty flavor. Sliced or diced, it provides a cooling counterpoint to the warm, spicy elements. The avocado also adds healthy fats that help the cheese sauce stay smooth. If you’re not a fan of avocado, a splash of Greek yogurt or a dollop of sour cream can fill the same role, but you’ll lose the unique creamy mouthfeel that avocado brings.
The Final Flourish
The final flourish is the glaze and the finishing touch of lime wedges. A simple glaze made from honey, lime juice, and a pinch of sea salt gives the tortillas a glossy finish that’s both eye‑catching and flavorful. The lime wedges, served on the side, let each person squeeze a fresh burst of citrus into their bite, adding a bright, zesty note that lifts the entire dish. If you’re looking to make the dish more adventurous, a sprinkle of smoked paprika or a dash of chipotle powder can add a subtle heat that pairs beautifully with the citrus.
Everything's prepped? Good. Let's get into the real action…
The Method — Step by Step
- First, warm your tortillas in a dry skillet over medium heat for about 15 seconds on each side. This makes them pliable and prevents them from tearing when you fold. You’ll know they’re ready when they start to glow slightly and feel soft to the touch. Don’t overcook them or they’ll become brittle.
- In a large bowl, combine the shredded chicken, black beans, corn, and cilantro. Toss them gently so the cilantro doesn’t wilt. The mixture should look like a vibrant green and amber swirl that’s ready to be wrapped. This is where the bulk of the flavor comes from, so don’t rush this step.
- Add the shredded cheddar and Monterey Jack to the bowl, and stir until the cheeses start to melt into the mixture. The cheeses should be evenly distributed, creating pockets of molten cheese that will coat the fillings. If you want a stronger cheese flavor, add an extra half cup of either cheese.
- Lay a tortilla flat on a clean cutting board. Spoon about a quarter cup of the filling onto the center of the tortilla, leaving a border of about an inch on all sides. The filling should be generous but not overflowing, so it stays inside when you roll.
- Fold the sides of the tortilla inwards, then roll tightly from the bottom up, tucking in the filling as you go. The roll should be snug but not too tight that it tears. This is the moment of truth; a well‑rolled tortilla holds its shape and keeps the filling together.
- Heat a large skillet over medium‑high heat and add a splash of olive oil. Once the oil is shimmering, place the rolls seam‑side down in the skillet. You’ll hear a sizzle that signals the tortillas are ready to brown. Cook for 2–3 minutes on each side, or until they’re golden brown and the cheese has melted into a glossy coating.
- While the rolls are cooking, whisk together the glaze: 2 tablespoons honey, 1 tablespoon lime juice, and a pinch of sea salt. Brush the glaze over the tops of the rolls as they finish browning. The glaze adds a sweet‑tangy finish that makes the rolls shine.
- Once all the rolls are golden, remove them from the skillet and let them rest for a minute. This allows the cheese to set slightly, preventing it from leaking out when you cut. Slice each roll in half diagonally for an elegant presentation.
- Serve immediately with lime wedges on the side, a dollop of sour cream or Greek yogurt, and a sprinkle of extra cilantro. The lime wedges are optional but highly recommended, as they add a fresh burst of citrus that lifts every bite. If you’re serving a crowd, set up a small dipping station with salsa, guacamole, and a handful of tortilla chips for extra crunch.
- Enjoy the symphony of textures and flavors. The first bite should be a warm, cheesy, and slightly sweet explosion, followed by the bright, citrusy finish that lingers on your palate. You’ll be tempted to taste again, but the sheer satisfaction of a perfectly cooked tortilla roll-up will keep you from going back for seconds.
That’s it — you did it. But hold on, I've got a few more tricks that'll take this to another level. Stay tuned for the insider tips that will make your roll-ups unbeatable.
Insider Tricks for Flawless Results
The Temperature Rule Nobody Follows
Many people think a low heat is the key to cooking tortillas, but the secret is a hot skillet that sears the edges quickly. The high heat locks in moisture and gives the tortillas a crisp, golden crust. If you lower the heat too much, the cheese will melt too slowly, and the tortillas will become soggy. I’ve tried this trick in the past, and the difference is night and day. The first time I cooked at medium heat, the rolls were a sad, pale brown; the second time, they were a beautiful, caramelized brown that made everyone ask for the recipe.
Why Your Nose Knows Best
Your sense of smell is a reliable indicator of doneness. As soon as the cheese starts to bubble and the tortillas emit a warm, buttery scent, it’s time to flip. If you’re a visual cook, keep an eye on the color; the edges should be a deep golden brown. But don’t rely solely on sight—trust your nose to tell you when the flavors are just right. I’ve found that smelling the aroma of melted cheese is the quickest way to avoid overcooking.
The 5‑Minute Rest That Changes Everything
After you remove the rolls from the skillet, let them rest for exactly five minutes. This short rest allows the cheese to set, preventing it from oozing out when you cut. It also lets the fillings redistribute, creating a more cohesive bite. I’ve had guests complain that their rolls were too runny; the five‑minute rest fixes that issue instantly. The rest is a small sacrifice for a huge payoff in texture.
Use Fresh Ingredients for Extra Flavor
Fresh cilantro and lime are non-negotiable for the bright, fresh flavor profile. If you can’t find fresh cilantro, try frozen chopped cilantro; it will still provide the essential herbaceous note. For the lime, squeeze a fresh wedge into the glaze—store‑bought juice can be too mild. The difference between fresh and store‑bought is a game‑changer. I’ve tried both, and the fresh ingredients give the dish a lift that no seasoning can match.
Make It Ahead for Parties
If you’re hosting a crowd, assemble the rolls a few hours ahead of time and refrigerate them. When you’re ready to serve, simply reheat them in the skillet or oven until the cheese is melty and the tortillas are crisp. This saves you from cooking under pressure and ensures a consistent quality. I’ve done this for a birthday party, and the guests were amazed that the rolls were still fresh and delicious after a day in the fridge.
Creative Twists and Variations
This recipe is a playground. Here are some of my favorite ways to switch things up:
Spicy Jalapeño Roll-U
Add diced jalapeños to the filling for a fiery kick. The heat pairs perfectly with the creamy cheese, creating a flavor profile that’s both bold and balanced. If you’re a heat lover, double the jalapeños and add a splash of chipotle sauce for extra depth.
BBQ Pulled Pork Roll-U
Swap the chicken for pulled pork tossed in a smoky BBQ sauce. The sweet and tangy sauce infuses the tortilla with a deep, savory flavor. Top with coleslaw for a refreshing contrast that’s reminiscent of a backyard cookout.
Vegan Bean & Veggie Roll-U
Use a plant‑based cheese and a mix of roasted veggies—such as zucchini, bell pepper, and sweet potato—in place of the chicken. The roasted veggies add earthiness, while the vegan cheese provides a creamy texture. This version is perfect for those who want a hearty, meat‑free option.
Breakfast Roll-U
Fill the tortillas with scrambled eggs, diced ham, and shredded cheddar for a breakfast twist. Serve with a side of salsa and a drizzle of maple syrup for a sweet‑savory combo that’s sure to start the day right.
Mexican Street Tacos Roll-U
Add a layer of refried beans, diced onions, and a sprinkle of queso fresco. The beans add creaminess, the onions bring crunch, and the queso fresco adds a salty, tangy finish. This variation brings the flavor of a street taco into a convenient roll‑up form.
Greek‑Inspired Roll-U
Replace the cheese with crumbled feta and add diced cucumber, kalamata olives, and a drizzle of olive oil. The feta brings a salty tang, while the olives add briny depth. Finish with a sprinkle of oregano for a Mediterranean twist.
Storing and Bringing It Back to Life
Fridge Storage
Store the assembled rolls in an airtight container in the refrigerator for up to 3 days. If you’re cooking ahead, keep the glaze separate until you’re ready to serve. When you’re ready to eat, reheat them in a skillet over medium heat until the cheese is melted and the tortillas are crisp.
Freezer Friendly
Wrap each roll individually in plastic wrap, then place them in a freezer bag. They can be frozen for up to 2 months. Thaw overnight in the refrigerator, then heat in the skillet or oven as described above. The texture remains firm, and the flavors stay intact.
Best Reheating Method
The best way to reheat is in a skillet with a splash of water to create steam. This keeps the tortillas moist while the cheese melts. Alternatively, preheat your oven to 350°F and bake the rolls for 10 minutes, or until heated through. Adding a tiny splash of water before reheating steams the rolls back to perfection.